An AED can empower any bystander to become a hero, but only if they can find it. In the chaos of a cardiac emergency, people don’t have time to search for equipment or ask for directions. Your AED must be so visible and clearly marked that it can be located without a moment of hesitation. This is why effective AED placement guidelines focus just as much on visibility, signage, and accessibility as they do on the physical location. It’s about creating a visual map that guides a rescuer directly to the device. This guide covers everything you need to know, from mounting height and ADA rules to the types of signs that cut through confusion and save precious time.
Key Takeaways
- Build your placement around the 3-minute rule: The most critical factor is ensuring anyone can retrieve the AED and return to the victim in under three minutes. Test your locations by walking the routes from the farthest corners of your facility to confirm you meet this life-saving window.
- Ensure your AED is visible and accessible to everyone: Use standardized, projecting signs so the device can be spotted from down the hall, and mount the cabinet handle no higher than 48 inches from the floor to comply with ADA standards and make it reachable for all.
- Develop a complete readiness program: Proper placement is just the start. An effective plan also requires a consistent maintenance schedule, regular staff training drills, and clear documentation to ensure your device is always functional and your team is prepared to act.
What Are the Guidelines for AED Placement?
Deciding where to place an automated external defibrillator (AED) isn’t a guessing game. It’s a strategic choice that can mean the difference between life and death. When someone experiences Sudden Cardiac Arrest (SCA), every second is critical, and having an AED nearby and accessible is the most important factor in a successful rescue. Following established guidelines ensures your device is exactly where it needs to be when an emergency strikes.
These guidelines aren’t just suggestions; they are rooted in data and best practices designed to maximize the chances of survival. They help you comply with legal requirements, meet accessibility standards, and create a truly effective emergency response plan. Let’s break down what you need to know to place your AEDs correctly and confidently.
Why Proper Placement is Critical
During a cardiac arrest, the chance of survival drops significantly with each passing minute. Proper AED placement is all about cutting down the time it takes to retrieve the device and deliver a shock. Research shows that if average AED response times are cut by just one minute, survival rates from SCA could increase by 10%—saving thousands of lives each year. The goal is to get the AED from its cabinet to the person’s side in under three minutes.
Placing AEDs in visible, central locations with high foot traffic ensures that anyone can find one quickly. Think about lobbies, cafeterias, fitness centers, or near elevators. The CDC recommends placing devices in areas with a high likelihood of cardiac arrest events, making your program more effective and prepared for a real emergency.

Know the Rules: Compliance and Regulations
While specific laws vary by state, the core principles of AED placement are consistent. First, your organization should create a written policy that documents every AED location, making it easy to manage inspections and direct responders. This documentation is key for maintaining compliance and proving due diligence.
Fortunately, all 50 states have Good Samaritan laws that offer liability protection to those who use an AED in good faith. Additionally, placement must adhere to accessibility standards, like the Americans with Disabilities Act (ADA). This means ensuring your AEDs are mounted at a height that is accessible to all employees, including those in wheelchairs. Following these rules doesn’t just keep you compliant—it ensures everyone in your building is protected.
Where Should You Place an AED in Your Building?
Choosing the right spot for your AED isn’t just about checking a box; it’s about creating a clear path to saving a life. When sudden cardiac arrest strikes, every second is critical. The ideal location is one that’s visible, accessible, and makes sense for your building’s unique layout and the people in it. Let’s walk through how to identify the most effective spots in your facility.
Find High-Traffic and Central Spots
Start by thinking about where people naturally gather. The best AED locations are in plain sight and easy for anyone to get to quickly. Walk through your building and look for central, high-traffic areas. Good examples include main lobbies, reception desks, employee break rooms or cafeterias, fitness centers, and busy hallways that connect different parts of your building. Placing an AED in these spots means more people will see it daily, and it will likely be closer to where an emergency might happen. The goal is to make the device easy to find without needing a map.
Identify High-Risk Zones
Next, consider areas where the risk of sudden cardiac arrest might be higher. This includes places where people engage in strenuous physical activity, like a gym or athletic field. It also includes large gathering spaces where more people congregate at once, increasing the statistical probability of an incident. Think about auditoriums, large conference rooms, or manufacturing floors. A comprehensive AED program management plan involves evaluating these specific zones to ensure you have coverage where it’s needed most, tailored to how your space is actually used.
Plan for Maximum Coverage
If your building has multiple floors, a good rule of thumb is to place at least one AED on each level. Position it in a central location, like near the elevators or main stairwell, so it’s equally accessible from all ends of the floor. The ultimate goal is to ensure that anyone can retrieve an AED and return to the victim within three minutes. For large, sprawling floors, you may need more than one device to cover the entire area effectively. Mapping out your facility and walking the routes from the farthest corners to the AED location is a great way to test your coverage.
How High Should You Mount an AED?
Once you’ve found the perfect spot for your AED, the next step is mounting it correctly. The height of your AED cabinet isn’t just a matter of convenience; it’s a critical factor in accessibility and compliance that ensures anyone can reach the device during an emergency. Getting this detail right is a simple but essential part of a successful AED program. It removes a potential barrier when every second is critical.
An AED that can’t be reached is an AED that can’t be used. By following established guidelines, you ensure your device is ready for any responder, regardless of their physical abilities. This is about more than just checking a box—it’s about creating an inclusive safety net for everyone in your building. Let’s walk through the specific rules to follow.
Follow ADA Compliance Rules
The most important rule for mounting your AED comes from the Americans with Disabilities Act (ADA). To meet ADA compliance rules, the handle of the AED cabinet must be no more than 48 inches from the floor. This specific height ensures the device is within reach for individuals who use wheelchairs or have other mobility limitations.
Think of this as the maximum height, not a suggestion. Mounting it any higher creates a serious barrier that could prevent someone from accessing life-saving equipment. Following this guideline is a foundational step in making your emergency response plan truly accessible and effective for every person in your facility. It’s a straightforward requirement that protects both your people and your organization.
Find the Right Mounting Height
While the ADA sets the maximum at 48 inches to the handle, this height also happens to be a great standard for almost everyone. It’s a comfortable, accessible level for most adults, allowing them to quickly open the cabinet and retrieve the device without reaching too high or bending too low. This standard for optimal accessibility is designed to make the process as smooth as possible during a chaotic and stressful event.
Sticking to this guideline removes any guesswork. When you install multiple AEDs across a large campus or in different buildings, keeping the mounting height consistent makes it predictable and easy for responders to find and use the equipment. It’s a small detail that contributes to a faster, more efficient response.
Ensure Wheelchair Accessibility
Mounting the AED at the correct height is only half the battle; you also need to make sure the area around it is completely clear. An AED must be placed in a location that is accessible to all individuals, which means maintaining a clear path and adequate floor space in front of the cabinet.
Avoid placing furniture, decorative plants, or trash receptacles in front of or directly next to the AED. Someone in a wheelchair needs enough room to approach the cabinet, open the door, and retrieve the device without obstruction. Regularly checking that these areas remain clear should be part of your routine maintenance plan. This ensures your commitment to accessibility is reflected in your building’s day-to-day operations.
What Signs Do You Need for Your AED?
Placing an AED in your facility is a critical first step, but it’s only half the battle. If no one can find the device during a cardiac arrest emergency, it might as well not be there. This is where clear, consistent, and visible signage comes in. Think of your signs as a visual map that guides a rescuer from wherever they are directly to the AED cabinet, without a moment of hesitation. In a high-stress situation, people don’t have time to search or ask for directions. The right signs remove the guesswork and help turn a bystander into a first responder.
Effective signage isn’t just about hanging a single sign above the AED. It’s a system. You need signs that announce the AED’s location, signs that point the way from different parts of your building, and a well-lit, unobstructed area so the cabinet is immediately visible. This system ensures that anyone—an employee, a customer, or a visitor—can locate the life-saving device within that critical three-minute window. A well-thought-out signage strategy is a non-negotiable part of a truly compliant and effective AED program, demonstrating that you’ve considered every step of the emergency response process. It shows you’re not just checking a box, but are genuinely prepared to save a life.
Ensure Clear Sightlines and Good Lighting
An AED should never be hidden. When you mount your AED cabinet, take a step back and look at it from multiple angles and distances. Is it blocked by a tall plant, a piece of furniture, or a stack of boxes? If so, move them. The path to the AED and the sign above it should have a clear, unobstructed sightline from as far away as possible. Good lighting is just as important. A dimly lit hallway or a corner that falls into shadow can easily obscure the device. By ensuring the area is well-lit, you make the AED and its signage stand out, which can significantly improve the chances of it being found quickly during an emergency.
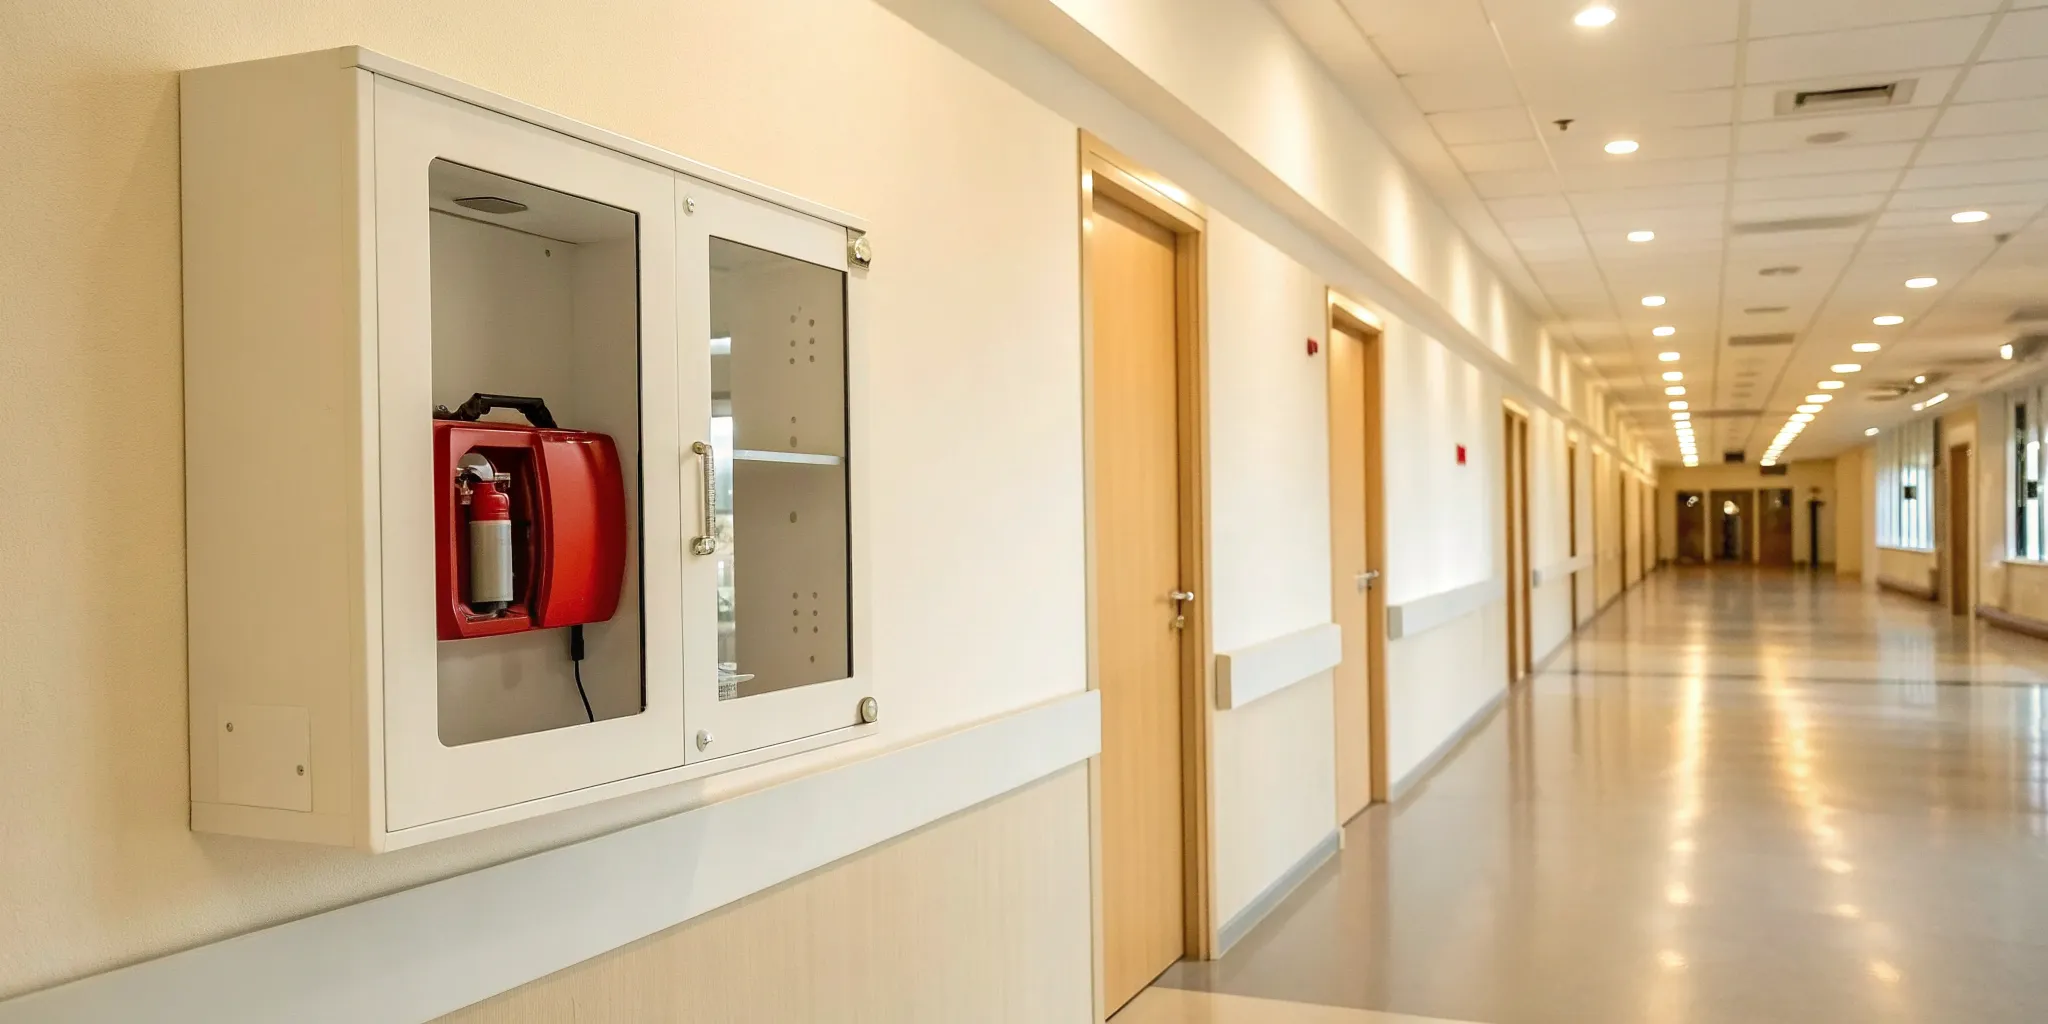
Use Standardized AED Signs
In an emergency, immediate recognition is key. That’s why you should always use universally recognized, standardized AED signs. These signs typically feature a bold heart symbol with a lightning bolt and the letters “AED.” This universal design cuts through language barriers and is instantly understood by most people, even those without formal training. Avoid creating your own custom signs, as they can cause confusion and delay. Sticking to the standard ensures that anyone looking for an AED can spot it without a second thought. Place a 3D or V-shaped sign that projects from the wall so it’s visible from down the hall, not just when you’re standing directly in front of it.
Guide People with Directional Signs
In larger or more complex buildings, a single sign above the AED isn’t enough. You need to create a clear path for people to follow from major entry points and common areas. Use directional signs with arrows at key decision points, such as hallway intersections, lobbies, and near elevators or stairwells. These signs act like breadcrumbs, guiding a rescuer step-by-step to the device’s location. For example, a sign in the main lobby might read “AED” with an arrow pointing down the correct hallway. This simple system can shave precious seconds off the response time, especially for someone unfamiliar with your building’s layout. It’s a small detail that makes a huge difference in a real emergency.
How Does the 3-Minute Rule Impact Placement?
When someone experiences Sudden Cardiac Arrest (SCA), every second counts. The “3-minute rule” is the industry benchmark for an effective AED program, stating that a person should be able to retrieve an AED and deliver a shock to a victim within three minutes of their collapse. This tight timeframe is the single most important factor in determining your AED placement strategy. If your team can’t get a device from its cabinet to the person in need within this window, your placement needs a second look. Meeting this goal requires careful planning to ensure your AEDs are always within reach.
Understand the 3-Minute Response Window
The chances of surviving a cardiac arrest drop by about 10% for every minute that passes without defibrillation. The 3-minute window isn’t arbitrary—it’s the point at which survival rates are still relatively high. This timeframe covers everything from someone recognizing the emergency to applying the AED pads and delivering a shock. Research shows that if average AED response times are cut by just one minute, SCA survival rates could increase significantly. Your goal is to make the retrieval part of that process as short as possible, giving the victim the best possible chance.
Map Out Your Response Distances
The best way to see if your facility meets the 3-minute rule is to walk it yourself. Start a timer and walk—at a brisk but not panicked pace—from the most distant points of your building to your proposed AED location. Consider different floors, wings, and even outdoor areas like parking lots or athletic fields. This exercise will give you a realistic list of response times and help you visualize how long it takes to get from one place to another. Remember to account for real-world obstacles like security doors, elevators, stairwells, and crowded hallways that could slow someone down during an emergency.
Place AEDs for Quick Access
Once you’ve mapped your response times, you can identify gaps in coverage and pinpoint the ideal spots for your AEDs. The more people that congregate in one area, the higher the likelihood of a cardiac arrest, so prioritize central, high-traffic locations. Your written policy should formally designate and document every AED placement location, creating a clear record for compliance and training. This documentation is a key part of a well-managed program. A comprehensive AED program management service can handle this entire process for you, from initial site assessments to ongoing compliance tracking, ensuring your devices are always ready and accessible.
Tailor Placement to Your Facility Type
Where you place your AEDs isn’t a one-size-fits-all decision. The layout, population, and specific risks of your facility all play a role in creating an effective placement strategy. A sprawling corporate campus has different needs than a single-story elementary school or a multi-level gym. Thinking through the unique challenges of your environment helps ensure your AEDs are exactly where they need to be when an emergency strikes. By tailoring your plan, you can close critical gaps in response time and give everyone in your building the best possible chance of survival.
Placement in Schools
In a school, AEDs protect students, staff, and visitors. Place them in high-traffic areas like the main office, gymnasium, cafeteria, and nurse’s office. For larger campuses, consider placing additional units near athletic fields or in separate buildings like auditoriums. The key is visibility and awareness. It’s not enough to just install the device; you need to make its location common knowledge. To ensure the safety of students and staff, you should publicize AED locations, run regular drills, and make emergency preparedness a visible part of your school’s culture.
Placement in Offices and Workplaces
For corporate offices and workplaces, clarity is crucial. Your emergency plan should include a map with clearly marked AED locations. Place devices in central spots like break rooms, reception areas, and near elevators. If your facility is large, ensure no area is more than a 90-second walk from a device. It’s a good practice to develop a written policy that officially documents where each AED is located. This removes any guesswork during a high-stress emergency and ensures every employee can quickly find the nearest device when seconds count.
Placement in Gyms and Healthcare Settings
Gyms, fitness centers, and even healthcare facilities have areas where the risk of sudden cardiac arrest is higher. When planning your layout, evaluate specific locations that see intense physical activity or high stress. In a gym, this could be near the weight room, cardio machines, or group fitness studios. In a clinic, consider waiting rooms and specialized treatment areas. Placing AEDs in these high-risk zones provides an extra layer of protection where it’s most likely to be needed, ensuring you’re prepared for the unique demands of your environment.
Placement in Multi-Story and Outdoor Areas
Large or complex facilities require a layered approach. In multi-story buildings, a good rule of thumb is to have at least one AED per floor, often placed in a central location like an elevator lobby. For outdoor spaces like sports fields, parking garages, or courtyards, placement is just as critical. These AEDs must be housed in weatherproof, climate-controlled cabinets to protect them from the elements. Properly maintaining your AEDs in these environments is key to ensuring they are ready to function correctly in an emergency, no matter the location.
Consider Your Environment and Security
Placing an AED is about more than just finding a central spot on a map. You also need to think about the physical environment where the device will live. An AED is a sophisticated piece of medical equipment, and factors like temperature, moisture, and security can directly impact its ability to function in an emergency. A well-placed device won’t do any good if its battery is drained by extreme cold or its internal components are damaged by humidity.
Protecting your investment and ensuring it’s always ready for use means considering the day-to-day conditions of its location. Is it in a dusty warehouse? An outdoor sports complex? A busy, unsecured lobby? Each scenario presents unique challenges that you need to address. Thinking through these factors helps you create a truly effective emergency response plan and is a core part of a comprehensive AED program management strategy. By protecting your device from the elements and potential theft, you ensure it will be there and in working order when seconds matter most.
Protect AEDs from Temperature and Humidity
Extreme temperatures and moisture are enemies of your AED. The sensitive electronics, batteries, and electrode pads can all be compromised if the device is stored in an area that’s too hot, too cold, or too damp. Most manufacturers specify an operating temperature range, and staying within it is crucial for readiness. Storing an AED in a temperature-controlled area is the best way to protect it. Regular visual inspections are also key—they allow you to check the readiness status indicator and ensure the storage conditions haven’t put the device at risk. This simple step helps you catch potential issues before they turn into device failure during an emergency.
Use Weatherproof Cabinets Outdoors
If you need to place an AED in an outdoor or exposed area—like a pool, park, or athletic field—you can’t just mount it on a wall. It needs protection from rain, dust, sun, and extreme temperatures. This is where weatherproof and climate-controlled cabinets come in. These specialized enclosures are designed to shield the AED from the elements, keeping it clean, dry, and within its safe operating temperature range. Using a proper outdoor cabinet ensures that your device remains functional and ready to use, no matter the weather. You can find a variety of AED accessories, including cabinets, to fit your specific environmental needs.
Secure Your AEDs from Theft
Your AED needs to be easily accessible in an emergency, but you also need to protect it from theft or tampering. Leaving a valuable piece of medical equipment completely unsecured can be risky, especially in high-traffic public areas. The solution is to find a balance between accessibility and security. Alarmed AED cabinets are an excellent choice. They keep the device visible and unlocked for quick access, but the loud alarm that sounds when the door is opened deters potential thieves. The alarm also serves the dual purpose of alerting others nearby that an emergency is in progress, helping to draw attention and assistance to the scene.
Make Sure Maintenance is Easy
When choosing a location, think about how easy it will be for your team to perform routine maintenance checks. If an AED is placed in a hard-to-reach spot, it’s more likely that essential inspections will be overlooked. Regular maintenance, including checking the readiness indicator and replacing expired pads and batteries, is non-negotiable for compliance and reliability. Ensure the chosen location allows staff to quickly and easily access the device for these checks without needing a ladder or special equipment. Making maintenance simple is a practical way to guarantee your AED is always ready to perform when called upon.
How Can You Raise Awareness About AED Locations?
Placing an AED is a critical first step, but its life-saving potential is only realized if people know where to find it during an emergency. A hidden or forgotten AED won’t help anyone. Building awareness is about creating a culture of preparedness where your team feels confident they can locate and use the device without hesitation. This requires more than a one-time announcement; it involves consistent training, clear communication, and ongoing reminders to keep the information fresh. By making your AED locations common knowledge, you empower everyone in your facility to act decisively when seconds count.
Train Your Team with Regular Drills
An emergency response plan looks great on paper, but regular drills are what build the muscle memory needed for a real crisis. Comprehensive CPR and AED training gives your team the skills to act, but drills ensure they can perform under pressure. Practice runs help employees become familiar with the AED’s location and build confidence in their ability to retrieve it quickly.
Conduct drills that simulate a real cardiac emergency. Have a team member start from their desk or a common area and time how long it takes them to get to the nearest AED. This simple exercise can reveal gaps in awareness and highlight the need for better signage or communication. The goal isn’t to create stress, but to make the response feel automatic and familiar.
Communicate Locations to Staff and Visitors
Clear and consistent communication ensures that everyone—from long-time employees to first-time visitors—can find an AED. Start with conspicuous signage. Bright, standardized signs should be placed above the AED cabinet and at key decision points, like hallway intersections or building entrances, to point people in the right direction. Think beyond wall signs; consider adding AED locations to building maps, fire escape plans, and digital directories.
Incorporate this information into your standard procedures. Mention AED locations during new employee onboarding, in safety manuals, and on your company’s intranet. For visitors, a note in the reception area or a line in an event confirmation email can make a big difference. The more you normalize this information, the more likely it is to be remembered.
Launch Awareness Campaigns
Keeping AED locations top-of-mind requires an ongoing effort. A single email announcement is easy to miss or forget, so plan regular awareness campaigns to reinforce the message. You don’t need a huge budget; simple, consistent reminders are highly effective. Use your internal communication channels, like company newsletters, Slack channels, or digital screens in common areas, to share quick facts about your AEDs.
Consider launching a campaign during National CPR and AED Awareness Week or as part of your organization’s safety month. You could create a short video tour of your AED locations, share success stories, or run a simple quiz to test employees’ knowledge. These activities keep your AED program visible and remind everyone that safety is a shared responsibility.
Avoid These Common Placement Mistakes
Even with the best intentions, some of the most common mistakes in AED placement can make your device useless during an emergency. A well-meaning but poorly placed AED creates a false sense of security and can have devastating consequences when someone suffers a sudden cardiac arrest. The goal is to eliminate every possible barrier between the rescuer and the device.
Thinking through your placement strategy helps you spot these potential roadblocks before they become a problem. From locked doors to expired batteries, small oversights can waste precious seconds when they matter most. Avoiding these simple but critical errors is the key to building an effective and reliable emergency response plan. A fully managed AED program can help you sidestep these issues entirely, ensuring your devices are always accessible, visible, and ready to save a life.
Don’t Lock It Away
An AED should never be placed in a locked room, office, or cabinet. While security is a valid concern, accessibility is far more important in a life-or-death situation. A locked door is a critical delay that a cardiac arrest victim simply cannot afford. Imagine a rescuer finding the AED cabinet only to realize they need a key or a code to open it—the time spent searching for access could be the difference between life and death. Your AED must be available to any bystander, employee, or visitor at a moment’s notice. Make sure your device is in a public, unlocked space where anyone can grab it and go.
Don’t Hide Your AED
Visibility is just as important as accessibility. An AED that’s tucked away in an unmarked cabinet, hidden behind a plant, or stored in a remote corner of the building might as well not be there at all. Use clear, universally recognized signage to point people toward the device. Wall signs should be mounted high enough to be seen over crowds or furniture. The goal is for someone who has never been in your building to be able to locate the AED quickly just by looking for the signs. Your AED cabinet should be well-lit and unobstructed, making it an unmissable part of the environment.
Don’t Forget the 3-Minute Rule
The American Heart Association recommends that a person in cardiac arrest receive a shock from an AED within three minutes of collapse. This isn’t just a guideline; it’s a critical window for survival. Your placement strategy must be built around this rule. A good test is to walk from the farthest point in your facility to the AED and back—this round trip should take less than three minutes at a brisk pace. If it takes longer, you need to add another device or find a more central location. Forgetting this rule means you’re not positioning your AEDs for maximum impact, putting people at unnecessary risk.
Don’t Neglect Maintenance
A perfectly placed AED is completely useless if it doesn’t work. Dead batteries, expired electrode pads, and software glitches can all lead to device failure during an emergency. Regular maintenance isn’t optional—it’s a core part of responsible AED ownership. Without routine inspections, you have no way of knowing if your device is ready for use. This is why ongoing program management is so important. It ensures that every device is checked, supplies are replaced before they expire, and your entire program remains compliant and response-ready. Don’t let a preventable maintenance issue be the reason your AED fails when someone needs it most.
Build Your AED Placement Strategy
Placing an AED is more than just a one-time task—it’s the foundation of an ongoing readiness program. A solid strategy ensures your device is not only accessible but also functional, compliant, and integrated into your overall safety plan. This is where you connect the dots between placement, maintenance, and training to create a system that works when you need it most. A well-documented strategy protects your organization and gives everyone confidence that they can respond effectively during an emergency. With a clear plan, you can manage every aspect of your AED program, from routine checks to full-scale emergency drills.
Set Up a Maintenance Schedule
An AED is only useful if it works. Regular maintenance is essential to make sure your device is ready to perform during a cardiac emergency. Without it, you risk having a device with expired pads or a dead battery fail when seconds matter most. Your maintenance schedule should include routine visual inspections to check the readiness indicator, confirm that supplies like pads and batteries haven’t expired, and ensure the device is clean and unobstructed. Assigning a specific person or team to this task and keeping a detailed log of each inspection is key. This is where AED program management can simplify everything by automating tracking, sending reminders, and handling supply replacements for you.
Integrate AEDs into Your Emergency Plan
Your AED shouldn’t be an afterthought; it needs to be a core component of your emergency response plan. The American Heart Association emphasizes that the goal of an AED program is to deliver a shock to a victim within three to five minutes of collapse. To achieve this, your plan must outline clear steps for responders. This includes who calls 911, who starts CPR, and who retrieves the AED. Regular drills help your team practice these roles so their response becomes second nature. Integrating the AED into your plan ensures everyone knows where the device is, how to use it, and what to do until professional help arrives.
Keep Up with Compliance and Documentation
Proper documentation is your best defense against liability and a key part of staying compliant. Many states have specific laws requiring regular AED inspections and maintenance logs. Your organization should have a written policy that documents the location of each AED and outlines your inspection and maintenance procedures. Keeping detailed records proves your program is managed responsibly and is always ready for an audit. This documentation should be organized, accessible, and consistently updated. A comprehensive compliance solution removes the guesswork by tracking everything from state registration to inspection logs, ensuring you’re always prepared.
Related Articles
- AED Mounting Guidelines: The Complete 2026 Guide
- AED Pad Placement: The Right Way to Position Pads for Safety
- AED Mounting Requirements: A Complete Guide
Frequently Asked Questions
What’s the single most important factor to consider when choosing an AED location? The most critical factor is time. Your goal should be for anyone to be able to grab the AED and get back to the person in need in under three minutes. This is often called the “3-minute rule.” When you’re scouting locations, physically walk the route from the farthest corners of your building to the proposed spot. If the round trip takes longer than three minutes at a brisk pace, you need to find a more central location or consider adding another device.
My building has multiple floors. Do I really need an AED on each one? Yes, in most cases, you should have at least one AED per floor. Relying on a single device for a multi-story building creates a significant delay, as a rescuer would have to wait for an elevator or run up and down stairs. Placing an AED in a central spot on each level, like near the main elevator bank or stairwell, ensures that everyone on that floor can access it quickly and meet that critical 3-minute response window.
I’m worried about our AED being stolen or tampered with. Is it okay to keep it in a locked office? An AED should never be kept in a locked room or cabinet. While security is a valid concern, accessibility during an emergency is far more important. A locked door can waste precious time that a person in cardiac arrest simply doesn’t have. The best solution is to use an alarmed cabinet. This keeps the AED visible and accessible to anyone, but the loud alarm deters theft and also alerts others nearby that an emergency is happening.
Besides placing the AED, what else do I need to do to make sure people can find it? Making your AED easy to find requires a system of clear and consistent signage. Start with a 3D sign mounted above the cabinet so it can be seen from down the hall. Then, place directional signs with arrows at key decision points, like building entrances and hallway intersections, to guide people directly to the device. Think of it as creating a visual pathway that anyone, even a first-time visitor, can follow without hesitation during a stressful event.
How do I make sure our AED placement is compliant with regulations like the ADA? To ensure compliance, you must follow the guidelines set by the Americans with Disabilities Act (ADA). This means the handle of the AED cabinet can be no higher than 48 inches from the floor, making it reachable for someone in a wheelchair. You also need to ensure there is a clear, unobstructed path to the cabinet. Keeping furniture, plants, or other items away from the AED is a simple but essential step in making your program truly accessible to everyone.